Create your WHM/cPanel VPS using AWS
- Lucille Conde
- Apr 28, 2024
- 2 min read
1. CREATE A VPC FIRST

2. CREATE A SECURITY GROUP FOR THE VPC
– choose the vpc you just created

Make sure all traffic is anywhere.

3. VPC – CREATE INTERNET GATEWAYCreate new internet gateway and attach it to the new VPC
4. Create EC2 instance

Next, you’re going to want to navigate to your EC2 Dashboard. Go to your home page and under the Compute heading select, “EC2.” Once you are on the dashboard select, “Launch Instance.”
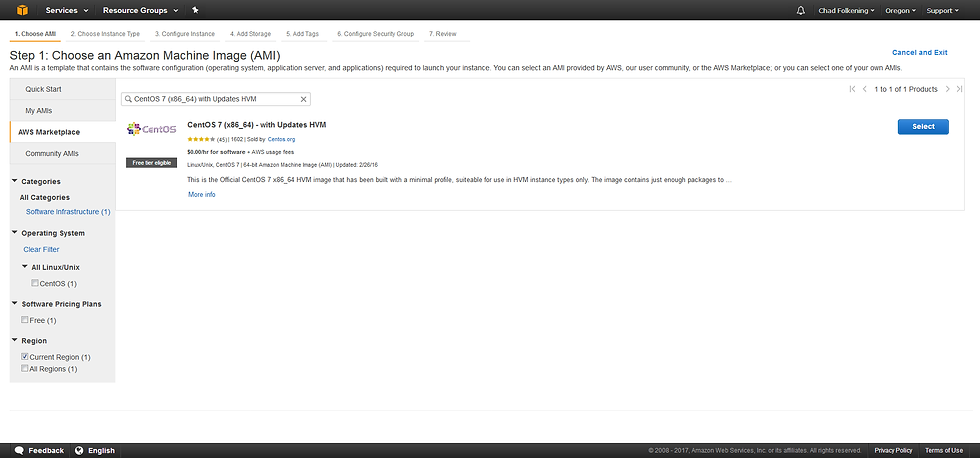
You will now be presented with a list of Amazon Machine Images (AMI’s) to select from. You’re going to want to select, “CentOS 7 (x86_64) with Updates HVM” from the AWS Marketplace. To find this, you may need to search for it under the AWS Marketplace tab. Once you have found the AMI, hit, “Select.”
a. select the type of memory you want

b. Configure instance details

choose the network or vpc you just created.
c. Add storagechoose the storage you want

d. Configure security group
Choose the security group you created earlier in the VPC dashboard

e. click launch and review
Click launch and create new security key and download to computer

f. instance completion preview

3. Create elastic ip
navigate to Elastic ip from within ec2 and click Allocate new address


4. Load into puttygen the key you downloaded and click save private key.
5. take note of public dns nameEG. ec2-34-210-47-172.us-west-2.compute.amazonaws.comYou will need for this logging into the server with ssh
centos@ec2-34-210-47-172.us-west-2.compute.amazonaws.comLoad into ssh->key the key file you created with your puttygen
6. Login in the servera. type sudo sub. yum install perlto install perlc. sudo yum install wgetd. type, “cd /home”e. wget -N http://httpupdate.cpanel.net/latestf. sh latestg. hostname host.yourdomainname.comh. sh latestg. passwd root then add any passwordh. configure hostname to the ip of the instance
7.Create another elastic ip for the nsFrom ec2 instance dashboard click Networking -> Manage private addresses

Network & Security > Elastic IPs in your EC2 dashboard. Click the “Allocate New Address” button at the top to create an IP address. Once it has been created, select the elastic IP and click “Associate Address” at the top or right-click on it and select “Associate Address“. A dialog will appear.
Leave the instance empty and under network interface, click inside the field to load the network interfaces. Now choose the same network interface that you created the primary, private IP address on. Then under “Private IP Address“, select the private IP that we just created in the previous step and then tick/check the “Reassociation” checkbox and click “Associate” to finish.
8. Configure whm1. add your hostname that you configured earlier eg hostcustom.yourdomain.com

Troubleshoot :http://docs.aws.amazon.com/AWSEC2/latest/UserGuide/TroubleshootingInstancesConnecting.html
1. If instance has No public dns -> Try this Go to console.aws.amazon.comGo To Services -> VPCOpen Your VPCsselect your VPC connected to your EC2 andselect Actions => Edit DNS Hostnames —> Change DNS hostnames: to YES
2. If you can’t connect to the instance – > Try to go to Route Tables and check if it’s connecting to the same instance like
10.0.0.0/16localActiveNo0.0.0.0/0igw-a75ebcc0ActiveNo


Comments